20200721

Adding Networking to the 2.11BSD pl 195 system

Adding Networking to 2.11BSD pl 195

So, now that I have an auto-installer, it would be nice, sometimes, to have networking. It also gives us a chance to push the envelop a little and learn about kernel builds. These instructions are for FreeBSD, alas, and other system may differ. However, the first section is the only part that's FreeBSD specific.

Simh config changes

I added the following to my simh.ini file:
SET XQ ENABLED
SET XQ TYPE=DEQNA
SET XQ MAC=08-00-4b-13-37-12
ATTACH XQ tap:tap0
and I also have the following in my /etc/rc.conf file:
cloned_interfaces="tap0 bridge0"
ifconfig_bridge0="addm em0 addm tap0 up"
ifconfig_tap0="up"
and the following in my /etc/sysctl.conf file:
net.link.tap.user_open=1
net.link.tap.up_on_open=1
These create a tap0 device, add it to the bridge0 device along with em0. em0 is my ethernet device, configured elsewhere.

For other OSes, you'll need to do something different for this section, but the rest of the blog is still useful.

Building a Networking Kernel

The GENERIC kernel that's installed lacks networking. It works on a wide variety of machines, but since the installation is from tape, there's no networking support (it's too big). So you'll need to build a networking kernel. This can be a bit tricky in the general case. However, given the machines selected, there's a close match to the SMS kernel. The instructions in the installation guide, however are a bit off. Well, not wrong, per se, but configuring kernels on 2.11BSD can be tricky. The documented instructions are straight forward enough;
# cd /usr/src/sys/conf
# ./config KERNEL
# cd ../KERNEL
# make all
# make install
which are familiar to old-time BSD hackers. Configure the kernel, cd to the build dir, then build and install it. However, with 2.11BSD, space is at a premium. This means that sometimes the make all will fail. if something is too big it will fail. The instructions for this are vague (move things around until it works, here's a few constraints to work with).

2.11BSD uses overlays to fit into the 64kB address space that the kernel has to work with. Well, on the PDP-11 that 2.11BSD runs on, there's actually 128kB of address space: 64k for instructions and 64k for data. These machines have separate I&D spaces, as this is called, managed by the MMU. And since things are managed by a MMU, there's an overlay scheme the kernel uses to fit that maps the upper 8kB into an 'overlay' region that the linker arranges to flip between as needed using one of the MMU segments. So this limits the 'base' part of the kernel to 56kB, and the overlays to 8kB. You can have many overlays (the kernel has 8 predefined). There's a small performance hit for calling routines in an overlay,
but it's not too bad unless the routine is called all the time. Think of it as a fairly static form of dynamic paging the VAX and others would introduce later. Finally, data isn't overlaid: the sum of the Data and the BSS sections have to be strictly less than 64kB. Many changes in the 469 patches concern saving space in the kernel in different ways. For a primer on details of text, data and bss, you can see traditional toolchain blog.

So the trouble comes when you configure too many things into the kernel (or the options align just so in a bad way to create a base > 56kB or any one overlay > 8kB). So, when this happens, you have to move things around a little (or a lot0. The canonical way to do that is to edit the /usr/src/sys/KERNEL/Makefile to move different .o files around so things fit. And when I've done this movement, I've had to do a make clean and start over to get the kernel to link properly (some of the helper programs built aren't properly rebuilt). Oh, and if the overflow is really big, the build stops at a stop where you think there's undefined symbols. But they are just from the network stack. I'll explain that in a future blog since it's a little non-standard, but kinda clever in how they shoe-horned a 62kB network stack into the kernel that's already out of space...

So, if you were to follow those directions for the SMS kernel at patchlevel 195, you'd hit this snag. One nice thing about the config shell script is that it saves a copy of the old Makefile. The SMS kernel comes pre-configured (eg pre-tweaked to be small enough). Diffing the makefiles reveals the fix. Moves vm_swp.o from the BASE set of objects to the OV6 set of objects. These are the swapping routines that swap things out. So while this is less than ideal, this is for an I/O operation, so the slight overhead of MMU segment flipping is acceptable. However, knowing what you can move and why it's OK is a black art that's likely learned by a lot of trial an error (and a good backup copy of Unix for the inevitable ooops).

tl;dr: do follow the directions. Instead "cd /usr/src/sys/SMS; make all; cp /unix /genunix; make install" But don't reboot just yet. Oh, and only do the cp if you've not installed a kernel before. This will be your backup to boot if you install a bad kernel, and it's best to never change that.

This is the issue, I think, that I'm running into with the kernel reconstruction for my as released project.

2.11BSD Network Configuration

Edit /etc/netstart. You'll need to fill in these lines:
hostname=my.domain.name
netmask=255.255.255.0
broadcast=127.255.255.255
default=127.0.0.0
as appropriate. I leave the default route alone, since I don't want this machine on the internet.  You'll also need to uncomment out the qe0 line and change 192.26.147.13 to the IP address for this machine. Then, when you reboot, you'll be able to get to the machine.

You may want to populate /etc/hosts. And maybe /etc/networks. Following the documentation for 4.2BSD or 4.3BSD network configuration will get the job done.

Create a user

Since you don't want to login as root, create a user using vipw. The sms account can be used as a template for what to do. You'll want to add this user to the 'wheel' group in /etc/group. You'll also want to make a home directory, chown it to this user, populate dot files, etc. And you'll likely want to set a password, but since you are using telnet, the password will be transmitted in the clear, so don't use a valuable one.

If you really do want to login as root, mark the PTYs as secure in /etc/ttys. You'll likely not want to do this. But it's a useful hack if you forgot to start simh in a 'screen' session and you want to hack as root from another room. OK for the short term, but you really don't want to leave it in this state.

Reboot

Use halt to halt 2.11BSD and get back to the simh> prompt. Type boot rq0 and hit return at the : prompt. hit ^D at the # prompt for single user and then login. ifconfig qe0 should show everything configured correctly. ftp and telnet are configured by default, for better or worse.

20200719

SIMH Setup for 2.11BSD restoration project

SIMH Setup for 2.11BSD pl 0 Project

So, you'd like to do more than just follow along with my 2.11bsd as released project. You'd like to see if you can recreate the work I've done. So I've written up the setup I'm using in the hopes that it will be helpful to others. There's many other tutorials on how to do this generically, but there's some special needs for this project not adequately covered elsewhere. I've written up the instructions you'll need to manually install, as well as provided a script at the end of the blog to do the same if you are impatient and jump right in.

Please note: this bootstraps 2.11BSD pl 195. This is an older version of 2.11BSD that has different installation procedures than latter-day installation versions and should only be used for that version. Even 2.11BSD pl 0 willl have slightly different instructions since the disk partitioning scheme changed in patch 78 which changed the name of the /usr partition.

Machine Configuration

I've configured SIMH emulated the machine like so:
  1. PDP-11/93
  2. 4MB RAM
  3. 2 RD54 disk drives
  4. 1 TS11 tape drive
  5. Serial Console
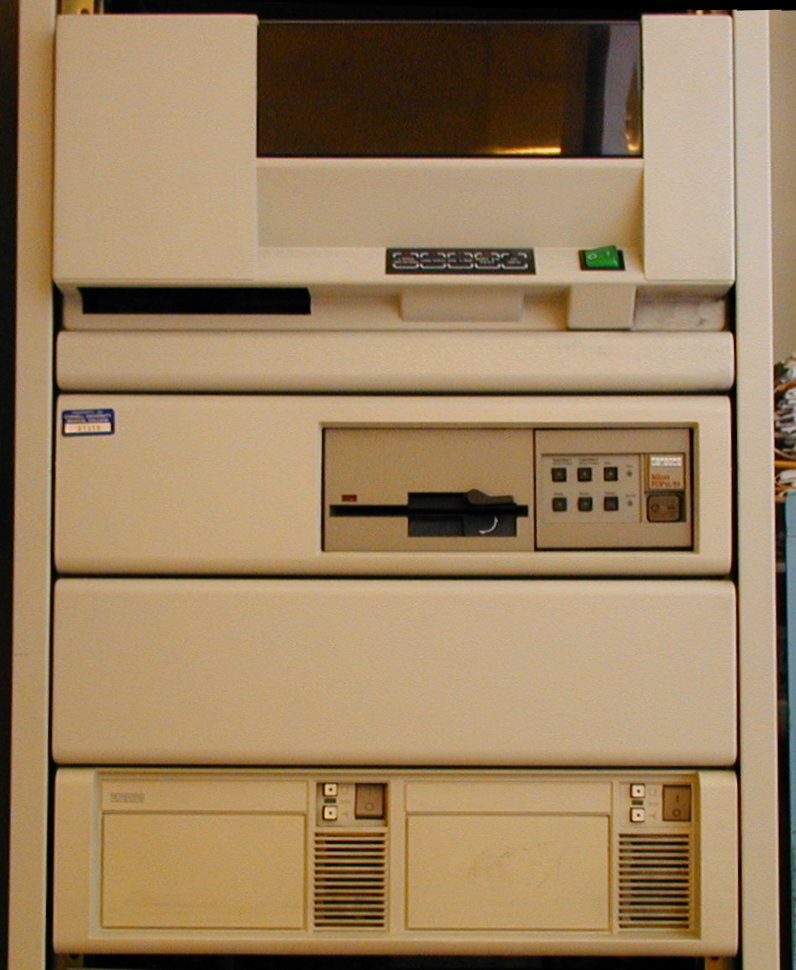
I've not taken the time to configure the network. All data transfer is done via the tape drive. It's way faster. Here's a picture of what real hardware for this configuration would look like, more or less. The tape drive on top isn't really a TS11 (it's something better: a Cipher drive that can do 6250bps, is front-loading, and likely a tms drive since it supports TMSCP, but pretend with me it's a ts device since that's the path I tested). 

SIMH configuration

SET CPU 11/93, 4M
SET CPU IDLE

SET RQ  ENABLE
SET RQ0 ENABLE, RD54, WRITEENABLED
ATTACH RQ0 ./211bsd-195.rd54
SET RQ1 ENABLE, RD54, WRITEENABLED
ATTACH RQ1 ./extra-data.rd54

SET TS ENABLE
SET TS0 CAPAC=0,LOCKED
ATTACH TS0 ./211bsd-195.tap
; ATTACH TS0 ./src.tap
SET DLI ENABLE
SET DLO0 NODATASET,8B
SHOW DLO0
set console pchar=01000023600 ; allow vi/more to work

; echo "At the SimH prompt type: ra(0,0)unix"
; BOOT RQ0
The rest of this document will assume the above configuration. Later I'll have you change it by commenting out or uncommenting lines. Save the above file to something like 2.11bsd-195.ini (the name I'll assume below). Or see the last section for a short cut.

Obtaining the 2.11BSDpl195 Tape

This isn't as easy as it sounds. You can snag the raw bits from:
https://www.tuhs.org/Archive/Distributions/UCB/2.11BSD-pl195.tar
But that's not a tape. It has all the parts to make a tape if you had a real PDP-11 with a tape drive. So we'll have to fake it. I hacked the canonical perl script to do it. You can find the results at
so you'll need to fetch those two items and do the following:
% tar xf 2.11BSD-pl195.tar
% gunzip  *.gz
% perl mk211p195tape.pl
bootstrap: 18432 bytes = 36 records (blocksize 512 bytes)
mkfs.bin: 30720 bytes = 30 records (blocksize 1024 bytes)
restor.bin: 35840 bytes = 35 records (blocksize 1024 bytes)
icheck.bin: 32768 bytes = 32 records (blocksize 1024 bytes)
root.dmp: 4126720 bytes = 403 records (blocksize 10240 bytes)
usr.tar: 28835840 bytes = 2816 records (blocksize 10240 bytes)
sys.tar: 5212160 bytes = 509 records (blocksize 10240 bytes)
src.tar: 40622080 bytes = 3967 records (blocksize 10240 bytes)
 
which will give you the 211bsd-195.tap you need to do the install. That filename is hard coded in the perl script.

Following the Instructions?

The pdf/ps files that are included with the patch 195 tape are for a newer version, so there's mistakes in them. The errors stem from disklabeling. It doesn't exist in 195, so you have to use old-school fixed partitions. You can read about the background on this in a previous blog entry. But see below for a twist with the RD54 disks i'm using...

On newer versions, the first file on the tape is disklabel, followed by mkfs, etc. On this older one, there is no disklabel, so the first file is mkfs, etc. This makes all the other fielding off by one in the instructions. This blog, however has the numbers right. It also makes this blog not completely useful for the newest version without adjusting...

A Word on Device Names in Bootloader

Device Names in the boot loader and stand alone programs are different than normal in unix. They used to be common, but now are unfamiliar to many, even for sysadmin. They are of the form xx(u, s, extra)file.

The "xx" is the name of the device. Two names will be important for us. The tape is "ts" and the disk is "ra".

The "u" is the unit number. It is basically the same as today, but with some weird rules if you have more than one controller. In this install everything will be unit 0, even though we have two disks. The second disk is for the recovery and will only be used inside unix.

The "s" is for subunit. For tape drives, it is the file number on the tape, starting at 1. For those that might not know, a tape has a series of records on it. These records are separated by end of file marks. There is also an end of tape mark. Both unix and the stand alone programs present this to the user as a series of files. To read a file, you need to know it's location and record size (hence specifying them when we made the tape above.

For disk drives "s" is the partition. Since this version doesn't yet have disklabels, we are using the standard rd54 partition scheme shown below. We will use it for both disks so that the scratch disk will become a bootable drive when we are done. "file" is the path to the file to boot. It's only meaningful for disks.

Finally, the ",extra" is optional for when devices are at non-standard addresses, so we won't use them. For those that must know, it is the CSR of the controller.

Installing with SIMH

Use your favorite package manager to install simh. This will work with most of the recent versions of simh, so the specific version is unlikely to matter. Put the two files in the same directory. We'll be booting a number of times. The outline of what you'll be doing:
  1. Booting off tape into mkfs to create the door filesystem.
  2. Booting again off tape into restor to populate the filesystem.
  3. Booting again, this time off disk, to restore /usr and configure the system.
  4. Rebooting to make sure it is all setup right. 
Once we are done, the system will be setup how it needs to be to build everything. That stuff will be in a separate blog entry, since it's too long to include with this one.

Alternatively, you could run the expect script that does the rest of this blog for you.

Mkfs Boot

This one is very simple and straight forward. Here and below user input is in red. And <cr> means carriage return (or just hit the return key).
% pdp11 211bsd-195.ini

PDP-11 simulator V3.9-0
Disabling CR
Disabling RK
Disabling HK
Disabling TM
RQ: creating new file
DLO0, 8b, no dataset, no logging
sim> boot ts
93Boot from ts(0,0,0172522)
: ts(0,1)
Boot: bootdev=01000 bootcsr=0172522
Mkfs
file system: ra(0,0)
file sys size: 15884
interleaving factor (m; 5 default): <cr>
interleaving modulus (n; 100 default): <cr>
isize = 10160
m/n = 5 100
Exit called

93Boot from ts(0,0,0172522)
:

The restor boot

Directly at the : prompt above, you should continue with the installation. The restor program takes the image on the tape and creates /.

93Boot from ts(0,0,0172522)
: ts(0,2)
Boot: bootdev=01000 bootcsr=0172522
Restor
Tape? ts(0,4)
Disk? ra(0,0)
Last chance before scribbling on disk. <cr>End of tape 

93Boot from ts(0,0,0172522)

Boot Unix

You should now be able top boot unix from the loader prompt. Note: there's no boot loader yet on the ra disk, so you can't boot off of 'RQ0' in simh just yet should you need to restart.
93Boot from ts(0,0,0172522)
: ra(0,0)unix
Boot: bootdev=02400 bootcsr=0172150

2.11 BSD UNIX #29: Tue Jul 12 19:51:16 PDT 1994
    sms1@sms.iipo.gtegsc.com:/usr/src/sys/GENERIC

ra0: RD54  size=311200 id: 40362564
ra0: type 2 partitions

phys mem  = 4186112
avail mem = 4002240
user mem  = 307200

Jul 18 09:59:12 init: configure system
hk ? csr 177440 vector 210 skipped:  No CSR.
ht ? csr 172440 vector 224 skipped:  No CSR.
ra 0 csr 172150 vector 154 vectorset attached
rl 0 csr 174400 vector 160 attached
tm ? csr 172520 vector 224 does not exist.
tms 0 csr 174500 vector 260 vectorset attached
ts 0 csr 172520 vector 224 attached
xp 0 csr 176700 vector 254 attached
erase, kill ^U, intr ^C
you should now be ready to install boot blocks and restore /usr and other filesystem(s), and configuring the system. Looking at the manual for ra(4), we find the RD54 has the following partitions;
          disk   start     end  length  comments
          ra?a       0   15883   15884  /
          ra?b   15884   32603   16720  swap
          ra?c   32604  331167  298564  /usr
          ra?d   unused
          ra?e   unused
          ra?f   unused
          ra?g   unused
          ra?h       0  331167  331168  whole disk
so we'll just need to create the /usr partition. However, turns out that the man page is wrong. This doesn't quite match the source to ra.c, nor does it quite match the disktab entry which says:
rd54|RD54|DEC RD54:\
        :ty=winchester:ns#17:nt#15:nc#1221:so:\
        :b0=/mdec/rauboot:\
        :pa#15884:ba#1024:fa#1024:\
        :pb#16720:bb#1024:fb#1024:\
        :pc#311200:bc#1024:fc#1024:\
        :pg#278596:bg#1024:fg#1024:
which I'll admit is a little hard to read. I misread it the first time. pX is the length of the X partition. The entire disk is 311200 blocks long, so the pc entry clearly is for that. The pg entry is what we want, since pa is for / and pb is for swap and if you add pa+pb+pg you get 311200. If, however, you look at the disktab from the initial revision of 2.11BSD (at least what I think it is), it matches the manual. So we're going to have to be careful when we boot the ur2.11BSD kernel once we get to that point (which we will in the 2.11BSD as released project, but won't in the rest of the installing 2.11BSDpl195). This mismatch, btw, is one of the many motivating factors for disk labels. Patch 78, btw, changed this without updating the man page. Fortunately, the only change for us if we wish to go backwards from 195 to 0 is to change the ra0g to ra0c in the /etc/fstab... but this digression has gone on too long...

Extract /usr, sources and minor config

Once we've booted to unix, we use a fairly familiar unix to extract things. The rest of the installation goes as follows
  1. Install new boot blocks
  2. Fix /dev/mt entries to match the TS-11 we have
  3. newfs and mount /usr (on /dev/ra0g)
  4. extract binaries from file 4, kernel/include src from file 5, and sources from file 6
  5. move sendmail out of the way so it doesn't hang the boot
  6. add /usr to the fstab
Here's the exact commands to do all that:
# dd if=/mdec/rauboot of=/dev/ra0a count=1
1+0 records in
1+0 records out
# cd /dev
# rm *mt*
# ./MAKEDEV ts0
# cd /
# newfs ra0g rd54
newfs: /etc/mkfs /dev/rra0g 139298 2 127
isize = 65488
m/n = 2 127
# mount /dev/ra0g /usr
# cd /usr
# mt -f /dev/rmt12 rew
# mt -f /dev/rmt12 fsf 5
# tar xpbf 20 /dev/rmt12
# cd /
# rm -f sys
# ln -s usr/src/sys sys
# cd /usr
# mkdir src
# cd src
# mt -f /dev/rmt12 rew
# mt -f /dev/rmt12 fsf 6
# tar xpbf 20 /dev/rmt12
# mt -f /dev/rmt12 rew
# mt -f /dev/rmt12 fsf 7
# tar xpbf 20 /dev/rmt12
# mv /usr/lib/sendmail /usr/lib/sendmail.off
# chmod 755 / /usr /usr/src /usr/src/sys
# echo /dev/ra0g:/usr:rw:1:2 >> /etc/fstab
# halt
syncing disks... done
halting

HALT instruction, PC: 000014 (MOV #1,13710)
sim> quit
and now you have a full system. 

Running 2.11BSD

You can now comment out the first ATTACH TS0 line and uncomment out the second. You can uncomment the last two lines, now when you run pdp11, you'll get output that looks like:
% pdp11 211bsd-195.ini

PDP-11 simulator V3.9-0
Disabling CR
Disabling RK
Disabling HK
Disabling TM
DLO0, 8b, no dataset, no logging
"At the SimH prompt type: ra(0,0)unix"

93Boot from ra(0,0,0172150)
: <cr>
: ra(0,0)unix
Boot: bootdev=02400 bootcsr=0172150

2.11 BSD UNIX #29: Tue Jul 12 19:51:16 PDT 1994
    sms1@sms.iipo.gtegsc.com:/usr/src/sys/GENERIC

ra0: RD54  size=311200 id: 40362564
ra0: type 2 partitions

phys mem  = 4186112
avail mem = 4002240
user mem  = 307200

Jul 19 10:04:46 init: configure system
hk ? csr 177440 vector 210 skipped:  No CSR.
ht ? csr 172440 vector 224 skipped:  No CSR.
ra 0 csr 172150 vector 154 vectorset attached
rl 0 csr 174400 vector 160 attached
tm ? csr 172520 vector 224 does not exist.
tms 0 csr 174500 vector 260 vectorset attached
ts 0 csr 172520 vector 224 attached
xp 0 csr 176700 vector 254 attached
erase, kill ^U, intr ^C
and you have a new system. ^D at the # prompt above gets you to the login: prompt.
# ^D Fast boot ... skipping disk checks
checking quotas: done.
Assuming non-networking system ...
usage: hostid [hexnum or internet address]
preserving editor files
clearing /tmp
standard daemons: update cron accounting.
starting lpd
starting local daemons:.
Sun Jul 19 10:06:06 PDT 2020


2.11 BSD UNIX (my.domain.name) (console)

login: root
Last login: Sun Jul 19 06:15:39 on console
2.11 BSD UNIX #29: Tue Jul 12 19:51:16 PDT 1994
[1] root--> df
Filesystem    kbytes    used   avail capacity  Mounted on
/dev/ra0a      15247    3504   11743    23%    /
/dev/ra0g     135203   73761   61442    55%    /usr
[2] root--> 
And now you have a 2.11BSD patchlevel 195 that you can use to run my bootstrap scripts.

Shortcut All of the Above

Or, you can shortcut all this stuff. As I've said above, I've written an expect script that will do all the tedious typing above. While all this typing recalls the manual nature of Unix installations in a by-gone day, it's rather a pain to do more than once. So i automated it. Just clone my mk211bsd github repo, fetch the tape and run the expect script and all this will happen for you. Since the output is the same, i've not included in these instructions.

% mkdir mk211bsd
% github clone https://github.com/bsdimp/mk211bsd
% cd mk211bsd/195
% tar xvf 2.11BSD-pl195.tar
% unzip *.gz
% perl mk211p195tape.pl
% expect 211bsd-195.expect
And you'll be able to skip directly to the "Running 2.11BSD" section since the expect script should do all the typing for you. I've run this script about a dozen times now, and think I have all the kinks worked out. This will give anybody that wants to help out with my 2.11BSD as released project the same setup that I'm using to bootstrap a 2.11BSD pl 0 userland. I'll describe how to do that in a future blog.

Just Following Along

I'll blog about my big progress, and tweet about my small. I'm @bsdimp on Twitter.

20200716

Traditional Unix Toolchains

Traditional Unix Toolchains

Older Unix systems tend to be fairly uniform in how they handle the so-called 'toolchain' for creating binaries. This blog will give a quick overview of the toolchain pipeline for Unix systems that follow the V7 tradition (which evolved along with Unix, a topic for a separate blog maybe).

Unix is a pipeline based system, either physically or logically. One program takes input, process the data and produces output. The input and output have some interface they obey, usually text-based. The Unix toolchain is no different.

Overview

Here's a simplified view of what's going on. We'll add more detail later.
In this view, the C compiler takes .c code and turns it into assembler. How it does that, and how it optimizes, etc is for another blog post. Once the assembler is created, it's passed to as(1) which translates the assembler into .o files. The .o files contain the binary representation fo the assembler, plus a lot of metadata about it: what addresses correspond to what symbols, how to relocate the raw assembler when connected together, various debugging information (sometimes) and what section each bit of data resides in. You cannot directly execute a .o file. ld takes all the .o files and produces an executable (the default name of which is a.out). a.out files are executable. They happen to be in the same format as the .o files, except they have a different magic number which tells the kernel how to load them into memory and initialize the CPU's registers for that program.

Program Layout

In traditional unix, there were only three sections to a program. There were no shared libraries or other fancy things done by the linker (such as linker sets). The world view was much simpler. There were three sections, each one had a size. There was the 'text' section. This was the executable code. There was the 'data' section, which contained initialized data. And there was the 'bss' section which also contained data that was initialized to 0. 
The heap resides above the bss and is managed by the unix sbrk(2) system call. The so-called "break" is set to the end of the bss segment (often referred to by the symbol ebss). Malloc(3) is built on top of sbrk(2) and will manage returning bits to the OS when it can.

For the PDP-11 and other segmented architectures, there can be complications. There can be separate I&D space (instruction and data) so that each one resides in it's own address space. This helps PDP-11 programs break the 64k limit. In addition, there can be overlays. Overlays are 8k segments that are mapped into the address space as needed to increase the text size of the program. The linker handles much of this, but the programmer must specify the overlap groups. Each group can be no more than 8k in size, and the main program can be no more than 56k in size (and the overlay manager uses 8k of the data segment as well). Programs in unix tend to not use overlays, but the kernel makes heavy use of them.

Compiler (cc, f77, etc)

Compilers create assembler output. Compilers, like the C compiler, may invoke other programs to do this. The C compiler runs the source through cpp to create an intermediate file (.i files) that it runs through the first pass of the C compiler. There are a number of other passes of the compiler that take the initial output and optimize it in various ways (usually by parsing and rewriting assembler). The final output of the compilers, at least in this era, is always textual assembler.

Assembler (as)

The assembler is the only thing in the system that creates .o files. Well, not strictly true since ld can also take .o files and produce a .o file from it, but true enough. The assemble takes the textual assembler and creates a .o file from that. The .o file includes information about how to relocate it (ld uses this info), what symbols go where, what bits are in the text section, what is in the data, etc.

Archive Files (ar)

It's fairly expensive to open a lot of files on Unix, especially if they are small. It's also inconvenient to carry around a number of different files to implement something. So unix ld also supports reading files in from an archive. An archive adds some headers to describe the file and then places a copy of the file into the archive. Unix has had a number of different archive formats (I could do a mini-blog entry on all of the ones through 4BSD), but conceptually they are all the same. The ar(1) program is used to create and manage .a files for this purpose.

One motivation for the library is to save space. If it's efficient to create a lot of tiny .o files, then the loader can only bring in what's needed saving space. When the address space is only 64k (or 64k+64k for separate I&D machines), every little bit helps. The archiver removes the overhead of having to do directory lookups on hundreds of files by creating a container for those objects that ld doesn't have to process by name.

When processing through a library, ld looks at each .o that's in the archive for symbols and includes it if it finds any that are needed for the current image so far. It just does one pass through an archive, though. This means if you have foo.o and bar.o in the archive and foo.o depends on bar.o somehow, foo.o needs to come first so that ld can find bar.o later. If they are in the other order, then ld may pass over bar.o entirely and then when it is processing foo.o, it will not go back and look for it.

lorder(1) and tsort(1) are used to try to optimize the order of the .o's in the library to make it possible to just do one pass through the library (though when you have circular dependencies, you're back to this same issue). lorder uses nm(1) to read all the .o's on the command line and produce dependencies. tsort takes these dependencies and sorts them into a list in the proper dependency order where possible. When cycles exist, it produces an order that minimizes passes required to resolve them all.

That sounds quite inconvenient, and it is. libc.a, especially in newer versions, has a number of circular dependencies that a single pass fails to resolve. One can work around this issue by specifying libc multiple times (which is unsatisfying, even if it doesn't produce a binary with two copies of everything), or do something else. The something else involves adding a table of contents to the library. A program called ranlib will read through an archive creating an index of defined symbols that points to the offset in the file that he .o with that symbol is present at. It does this by creating a first member of the archive named __.SYMDEF and placing its table in there. The format of the table is something that ranlib and ld agree on. ld uses this table to include files that are needed and to be able to seek backwards easily. In effect, this is the same as ld doing two passes over an archive (one to build this index, and one to process it), but in effect precomputes the first pass to keep ld simpler.

Loader (ld)

The linker can operate in two different modes. The first mode most people are not familiar with. In this mode, it will take .o files and partially link them together to produce a new .o file. libc uses this mode of operation to create all the assembler glue to call system calls and optimize out some of the local labels that the assembler produces and expects ld to optimize away. Since these files are consulted so often, the build process of libc does it at build time so that every invocation of ld later can be faster.

The second mode is the mode people are more familiar with. In this mode, ld combines a number of .o and .a files to create an executable (a.out by default, so that's what people call executables in general). a.out binaries lacked shared libraries, so ld produced the final output. This was both good and bad. It wasted space with all those copies of libc, but it also produced self-contained binaries that didn't need any external libraries to work. The PDP-11 didn't really have good demand paging hardware, like the later VAX machines, so was a poor fit to shared libraries. Shared libraries generally rely on mmap(2) working and larger address spaces to map the libraries in at. mmap(2) requires a page-grained MMU, which didn't usefully exist on the PDP-11 (it had 8k segments, which was far to large a percent of the whole address space to be useful). One good thing about binaries being self contained means that if the kernel can run the system calls that are in it, the binary will work. This has allowed PWB systems to be able to execute both v6 and v7 binaries, despite the two having different system call interfaces.

The Kernel

Speaking of the kernel, the kernel is the last step in the toolchain, or can be thought of as such. The kernel reads in the headers from the a.out files, and sets up the address space for the process when a new a.out binary is exec'd. It uses the layout I showed above, or some variant of it, to set things up, to populate memory and makes whatever arrangements with the MMU to protect the pages from other processes (if possible, some systems like an 8086 don't have MMUs but do have segments so can fake all this except the memory protection benefits). For separate I&D space binaries, it also sets up the segment registers for that to work.

The stack is also initialized. The detail of exactly where it goes varies somewhat. It's usually located with the data segment since it holds data almost exclusively. Stacks in this era were usually quite small. This tended to drive programs that had shallow call graphs and that made use of more global variables than a more modern style would suggest. All these things conserved stack space, though it's generally agreed today that it required more effort to read and understand because the context is spread out over more parts of the program than more modern coding practices tend to produce.

Conclusion

Without the complications of shared libraries, or link time optimizations, the tools of this area tended to be rather simple. They had simple interfaces between them. There were good boundaries between the different components. This limited the number of programs with knowledge of the formats for the different layers. Due to this limited spread of knowledge, switching out different parts for other parts often could be done without changing components that didn't directly know about the object format. This also produced simpler programs that used different engineering tricks to get the most performance out of the limited hardware of the day. The PDP-11s were approximately 0.1-0.5MIPS machines in this time frame with super slow I/O paths. This is about 100,000 times slower than most computers people interact with today. One advantage of the thoughtful engineering trade offs is that all the pieces are relatively easy to understand.

The modern ecosystems that we have today are more complex. ELF came along in the 90s and obsoleted the text, data, bss world view. shared libraries made huge programs, like X11, feasible. Today, clang bypasses the separate assembler stage and generates .o files directly. The llvm linker, lld, can optimize binaries between modules to produce better code. All these new features added complication to a simple model. While I morn for the loss of simplicity, I've become too used to the rich features they provide to want to go back. Understanding the roots of this complexity, though, helps to understand some of the weird quirks that persist, even to this day.

And speaking of weird quirks, I'd like to end with 'bss'. It's a 1950s IBM assembler mnemonic for 'block started by symbol' and was used to create storage that was associated with a symbol, but had no initial value. Today, 'bss' is no longer that, exactly. Its origin has been lost, for most people, in the sands of time and now it just means 'zeroed storage area'. So this very Unix centric term actually predates Unix by 10 or 15 years for a machine that Unix wouldn't run on until it was 10 or 15 years old... Here's a snapshot from the IBM assembler manual, available from the UA-SAP wikipedia page
showing the original source...

[[ This blog edited to include snapshot of the BSS manual entry ]]